Today was Crazy Krafting Saturday in honor of Cara's birthday. You combine two crafting women along with 2 trays, 1 TV tray, 2 cabinet doors, 4 spindles, one large piece of wood, two two by fours,
8 nesting boxes, 1 picture frame, 1 drawer, a vintage 1975 Atlas and then throw in Mod Podge, wax, paint, a drill, and a sander and you have a really big time. Come back soon to see the results.
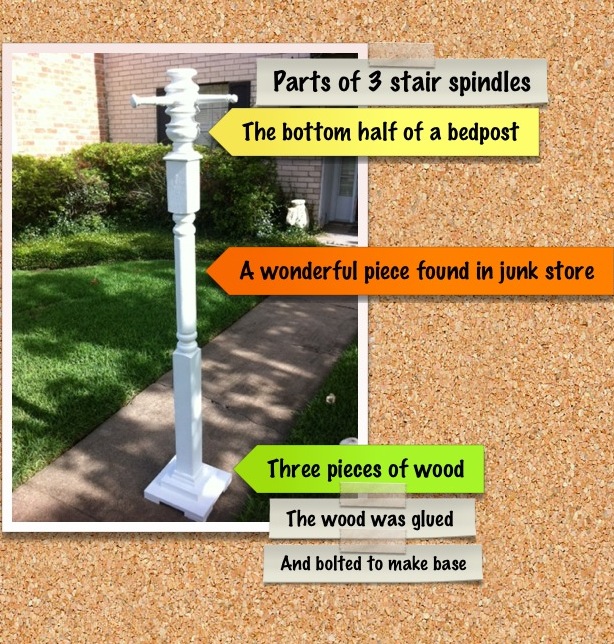
Saturday, August 17, 2013
Wednesday, August 14, 2013
Repurposed Table #3

This is my third repurposed table and I am getting more proficient and faster with each table.

This table started with a cabinet door that my daughter found for me. The one I used was not painted but I forgot to take a picture of the one I used before the table was assembled.

I found the base at Goodwill. I think it had been a knick knack shelving unit during the 1980's. It was the perfect size for the cabinet door.

I got the legs that I used from the Restore in Beaumont, Texas. They were from a taller table but I cut them down to the right height for this table

I attached the cabinet door to the base with screws and glue.

I painted the base brown and started painting a chevron on the top. I found that I did not like painting the chevron pattern. Half way through I decided I did not want to finish the design.
I finished it off with a dark wax.

Check out two of my favorite blogs!


Tuesday, August 13, 2013
Late Summer Gardening

This is a quote from an old Southern Living Gardening Book that I first read not long after college:
Gardeners want lots of show for not much dough. That's why they should plant coleus. It costs little, grows quickly, and has the gaudiest foliage imaginable. It's equally happy in the ground or in a pot.When I first read that I knew coleus was for me. My current garden is a patio. This spring I planted coleus and it was gorgeous. As the summer wore on and I traveled and was out of town for long periods of time my garden suffered. I am home now and about to go back to work. Today my "to do" list included cleaning the patio. I pruned the coleus first. When I had a pile of beautiful coleus leaves at my feet I could not throw them away. I needed a small "happy" for someone and decided a bunch of coleus would do the trick.

I wrapped the jar in left over burlap from another project and tied it with tulle. I was happy with the look of it.Then I got to wondering if the coleus could be rooted in water. To answer this question I did a quick Google search and found out everything I ever wanted to know about coleus.
http://www.growingthehomegarden.com/2008/08/coleus-cuttings-are-they-easiest.html is a site that has much information about coleus and how easy it is to propagate cuttings.
Friday, August 9, 2013
Goodwill Hunting Dos


Thursday, August 8, 2013
Green Picture/Recipe Holder


I attached the bulldog clip with a screw and a drop of glue.

This would be perfect in the kitchen to attach a recipe to.

I love it with a piece of scrapbook paper behind the picture.

Friday, July 26, 2013
Orange Again!


I used Gorilla Glue to put the parts together and painted it orange.

Sunday, July 21, 2013
Hall Tree


This is another of my favorite blogs!

Saturday, July 20, 2013
Raspberries

We finally picked enough to make a pie. In the olden days I might have starved to death.


This is not my friends recipe, but one out of my collection. I do not make the crust but let Betty Crocker do that for me.
- 2 cups all-purpose flour
- 1/2 teaspoon salt
- 2/3 cup shortening
- 6 - 7 tablespoons water
- 3/4 - 1 cup sugar
- 1/3 cup all-purpose flour
- 5 cups raspberries
- 2 teaspoons finely shredded lemon peel
- Milk (optional)
- Sugar (optional)
1. In a mixing bowl combine the 2 cups flour and salt. Using a pastry blender, cut in shortening until pieces are pea-size. Sprinkle 1 tablespoon of the water over part of mixture; gently toss with a fork. Push moistened dough to side of bowl. Repeat, using 1 tablespoon water at a time, until all the dough is moistened. Divide in half. Form each half into a ball.
2. On a lightly floured surface flatten one dough ball. Roll from center to edges into a 12-inch circle.
3. To transfer pastry, wrap it around the rolling pin; unroll into a 9-inch pie plate. Ease pastry into pie plate, being careful not to stretch pastry.
4. In a large mixing bowl combine the sugar and 1/3 cup flour. Stir in berries and lemon peel. Gently toss the berries until well coated. Transfer berry mixture to the pastry-lined pie plate.
5. On lightly floured surface roll remaining dough into a 12-inch circle. For a lattice crust, trim bottom pastry to 1/2 inch beyond edge of pie plate. Cut rolled pastry into 1/2-inch strips and weave strips over filling. Fold bottom crust over strip ends; trimming strips as necessary. For a 2-crust pie, trim bottom pastry to edge of pie plate. Cut slits in top crust for escape of steam; place on filling and fold edge under bottom pastry. Flute edge as desired.
6. If desired, brush pastry top with a little milk and sprinkle with additional sugar.
7. To prevent overbrowning, cover edge of pie with foil. Bake for 25 minutes. Remove foil. Bake in a 375 degree F oven for 25 to 30 minutes more or until top is golden. Cool on wire rack. Makes 8 servings.
Friday, July 19, 2013
Orange Bowl
 |
This is a pedestal bowl that I made today. Today was my second day at home. I have been out of school for three weeks have been traveling. For the last two days I have been home alone and feeling very creative. Last night when I bought lemons it inspired me to make an orange bowl. The reason I chose orange is that it will be good with summer colors but will transition so well into fall. I cut a piece of the leg and glued it to a base. Then I searched until I found a wooden bowl I bought in March at Goodwill. The bowl was a fifty cent find that I had been wanting to use. |

Next came my two favorite things: my drill and glue.


Now I am ready for some afternoon lemonade.

Thursday, July 18, 2013
Red Chest
 |
I recently went to see friends in Huntington, WV where I lived for 6 wonderful years. When my friend showed me the bedroom where I would be staying I saw this wonderful red chest(footlocker). It had been her fathers and she had repainted it red in the 1970s. It was red, chippy, and perfect. It had that wonderful aged look that did not come from some new technique on Pinterest but from many moves and five children (all boys)! I jokingly tried to talk her into putting legs on it. I love chests with legs, but she declined the offer. It was so perfect that I wanted the world to see it. I will be posting more pics of my amazing stay in WV. My friend lives in the country and one of the best parts of my visit is that we did not rush to start our days but lingered over breakfast and talked and talked and talked. We had a year to catch up on. Another thing that made the mornings special were this deer and her twins. We saw them twice and it was amazing how beautiful they were. |
Tuesday, July 9, 2013
At The Beach!

head. Last week we met friends at the
beach and I wanted to make something
for my friend Jan for her birthday.

for only twenty five cents. I originally was going to
paint it and put it on a pedestal (6inches or so). I thought
it would be cute with fruit in it. But then I saw a beach
table at Academy and completely changed my mind.


from the Dallas Restore. Then I glued and
screwed the tray to the base I had made.
Originally it was going to be green but
ended up a different color.

all day. I think Jan was impressed when
someone came by and wanted to buy it.


 I love this link party! You should check it out I have gotten so much inspiration from the posts I have seen there. Definitely worth your time.


Subscribe to:
Posts (Atom)