Saturday, August 17, 2013

Crazy Krafting Saturday

Today was Crazy Krafting Saturday in honor of Cara's birthday.  You combine two crafting women along with 2 trays, 1 TV tray, 2 cabinet doors, 4 spindles, one large piece of wood, two two by fours,
8 nesting boxes, 1 picture frame, 1 drawer, a vintage 1975 Atlas and then throw in Mod Podge, wax, paint, a drill, and a sander and you have a really big time. Come back soon to see the results.

Wednesday, August 14, 2013

Repurposed Table #3


This is my third repurposed table and I am getting more proficient and faster with each table.
This  table started with a cabinet door that my daughter found for me. The one I used was not painted but I forgot to take a picture of the one I used before the table was assembled.
 
I found the base at Goodwill. I think it had been a knick knack shelving unit during the 1980's. It was the perfect size for the cabinet door.


I got the legs that I used from the Restore in Beaumont, Texas.  They were from a taller table but I cut them down to the right height for this table

I attached the cabinet door to the base with screws and glue.

I painted the base brown and started painting a chevron on the top. I found that I did not like painting the chevron pattern.  Half way through I decided I did not want to finish the design.

I finished it off with a dark wax.
 
 
Check out two of my favorite blogs!
 Photobucket
 
 
 Funky_Junk's_Party_Junk_link_party_150

Tuesday, August 13, 2013

Late Summer Gardening

This is a quote from an old Southern Living Gardening Book that I first read not long after college:
Gardeners want lots of show for not much dough. That's why they should plant coleus. It costs little, grows quickly, and has the gaudiest foliage imaginable. It's equally happy in the ground or in a pot.
When I first read that I knew coleus was for me.  My current garden is a patio.  This spring I planted coleus and it was gorgeous. As the summer wore on and I traveled and was out of town for long periods of time my garden suffered.  I am home now and about to go back to work.  Today my "to do" list included cleaning the patio. I pruned the coleus first.  When I had a pile of beautiful coleus leaves at my feet I could not throw them away.  I needed a small "happy" for someone and decided a bunch of coleus would do the trick.
 I wrapped the jar in left over burlap from another project and tied it with tulle. I was happy with the look of it.Then I got to wondering if the coleus could be rooted in water. To answer this question I did a quick Google search and found out everything I ever wanted to know about coleus.
 http://www.growingthehomegarden.com/2008/08/coleus-cuttings-are-they-easiest.html is a site that has much information about coleus and how easy it is to propagate cuttings.
 

Friday, August 9, 2013

Goodwill Hunting Dos

I have been blogging so often about the wonderful, junky finds that come from the Restore that I have not shown much love to Goodwill.  I love to go to Goodwill.  They have such a wide variety of good junk just waiting to be given a second chance.  Not long ago I found this wonderful find.  It is solid wood and had been painted pink and blue with a goose on the child (think 1985).  Yesterday I decided it was it's turn to get a makeover.  I painted with my favorite red.  I can't tell you the color name.  I took an old Ralph Lauren sweater to Lowes and they mixed this red for me.  I call it Ralph Lauren Red.  I think I went with red because it looks like fall.  When I tire of it in front of the fireplace I plan on using it to store sewing notions.  It would also make a cute tool box.  Thanks again Goodwill, you made my day!

Thursday, August 8, 2013

Green Picture/Recipe Holder

I started this photo board the day I made the orange bowl. I got frustrated with it and put it to the side for a couple of weeks.  I could not get the base attached to the board.  Tonight I went back and worked on it and everything worked perfect.  It is amazing what happens when you don't push and let creativity come to you in it's own time.
I attached the bulldog clip with a screw and a drop of glue.

This would be perfect in the kitchen to attach a recipe to.

I love it with a piece of scrapbook paper behind the picture. 


Friday, July 26, 2013

Orange Again!

I am continuing with the orange theme started last week.  I think it is such a great transitional color between summer and fall.  This was made out of some Goodwill finds.
These are some more of the finds from Goodwill.  I got them awhile back when they had a half off sale on their home goods.  I had sacks of great junk when I left that day.  I wanted to make a tall candlestick to go with a grouping in front of my fireplace.  I wanted something summery and light.
I used Gorilla Glue to put the parts together and painted it orange.
This is the finished grouping I made.  I have posted about the crosses that I make before.  The turquoise candle holders are made from vintage spindles.  This is the second set of these turquoise candle holders I have made and I still love them.

Sunday, July 21, 2013
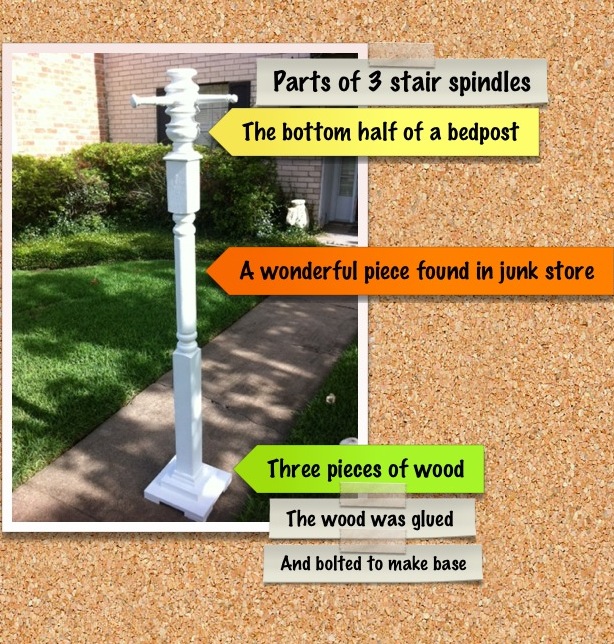
Hall Tree


I completed this hall tree a few months ago.  It has been waiting to be painted but I have decided I may leave it white and antique it up a bit.  This piece would never have gotten made if I had any knowledge of how hard it was going to be to attach the separate pieces before I started.  I think I have told you that I don't have many tools. I have and ancient saw (which I will not take a picture of because if I looked at the picture I might realize I should not be using it), a drill and glue.  If a project needs more than that it is not for me. I came across the main part of this project at a junk store in Galveston, Texas.  I think it had been a porch post, but was burned on one end so who knows what its first life was. The top section was from a bed post that came out of some ones trash.  I used the top part in another project that I blogged about earlier.  The original post that I got in Galveston was too short so I decided to add the bed post to it.  The problem was how to do this.  I went to Lowes.  The person I talked to first said very nicely, "No way!".  I think he wanted to ask why I was let out on the "home for the insane", but he was to kind to do that. The second person told me about double sided screws. 
The one he suggested was about 6 inches long.  He could not really tell me how to use it, but thought it would work.  I came home and googled and basically found out that I needed to drill two holes and then attach the screw to one piece of wood and then the other.  About two weeks later I finally did that.  It was harder that it sounded.  The hall tree was now the correct height and all it needed was a base and arms. 

The base was made out of three pieces of scrap wood that I bought at the Restore.  I glued and bolted them together.  I then attached the base using another double sided screw.  It turned out to be very sturdy.  The final step was to add the arms. The arms were made of scrap pieces of spindles left over from other projects.  Again I used double sided screws to attach them.  I used wooden drawer knobs on the end of the arms to add interest and cover up my bad cutting job. I wish I had taken pictures of the process but I never thought I would finish so, no photos.  I may add some decorative hooks and paint it later.  If I do I will post pictures.

This is  another of my favorite blogs!

<br><br><br><b>Join us every Friday...</b>