

I completed this hall tree a few months ago. It has been waiting to be painted but I have decided I may leave it white and antique it up a bit. This piece would never have gotten made if I had any knowledge of how hard it was going to be to attach the separate pieces before I started. I think I have told you that I don't have many tools. I have and ancient saw (which I will not take a picture of because if I looked at the picture I might realize I should not be using it), a drill and glue. If a project needs more than that it is not for me. I came across the main part of this project at a junk store in Galveston, Texas. I think it had been a porch post, but was burned on one end so who knows what its first life was. The top section was from a bed post that came out of some ones trash. I used the top part in another project that I blogged about earlier. The original post that I got in Galveston was too short so I decided to add the bed post to it. The problem was how to do this. I went to Lowes. The person I talked to first said very nicely, "No way!". I think he wanted to ask why I was let out on the "home for the insane", but he was to kind to do that. The second person told me about double sided screws.

The one he suggested was about 6 inches long. He could not really tell me how to use it, but thought it would work. I came home and googled and basically found out that I needed to drill two holes and then attach the screw to one piece of wood and then the other. About two weeks later I finally did that. It was harder that it sounded. The hall tree was now the correct height and all it needed was a base and arms.
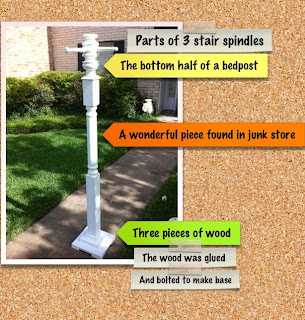
The base was made out of three pieces of scrap wood that I bought at the Restore. I glued and bolted them together. I then attached the base using another double sided screw. It turned out to be very sturdy. The final step was to add the arms. The arms were made of scrap pieces of spindles left over from other projects. Again I used double sided screws to attach them. I used wooden drawer knobs on the end of the arms to add interest and cover up my bad cutting job. I wish I had taken pictures of the process but I never thought I would finish so, no photos. I may add some decorative hooks and paint it later. If I do I will post pictures.
This is another of my favorite blogs!


No comments:
Post a Comment